30.11.06

Where, oh where can this fabric be?

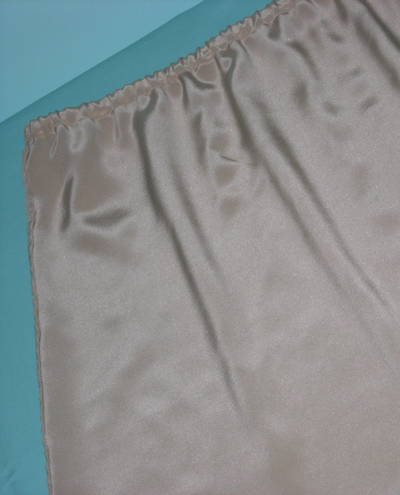
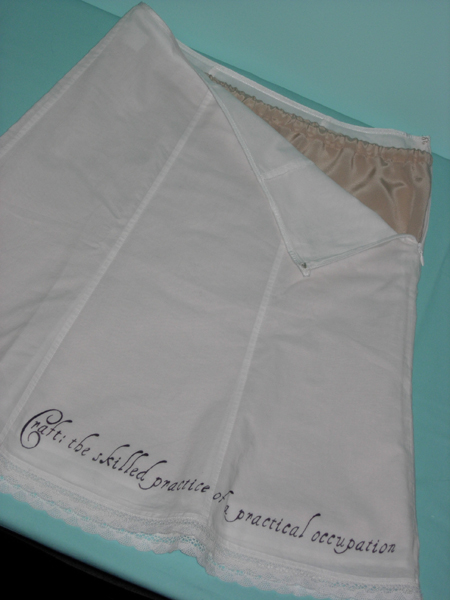
I'm just dying to find this fabric!

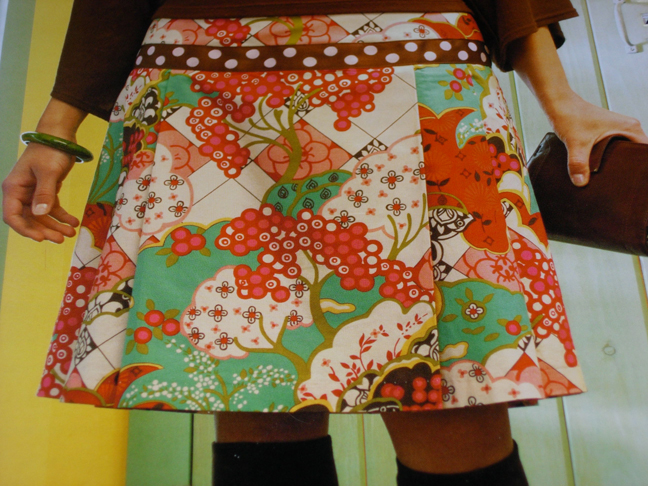
It's featured in the Asian Dream skirt in Sew What! Skirts, and I ADORE it! I've been looking and looking, and I can't seem to track it down, can anybody help me? (The polka dots are trim, and not part of the motif.)

It's actually slightly blue-er, and the red is more pink, really. If anyone can find it for me, I'll swap nearly anything for it!

Kool Aid Dyed Yarn

This is the final result - yeay robin's egg blue yarn!

Alright, so I'm obsessed with robin's egg blue, have been for 3+ years now! I still love purple (my first favorite color,) but I knew I had to try for robin's egg, since it's so hard a color yarn to find. I started with Lion brand Wool in cream. For my first try I only used one packet of Ice Blue Raspberry Kool-Aid, and it turned out slightly more minty green, and less robin's egg blue than I wanted. No matter, just dye, dye again! LOL

Here's the color after the first round of dyeing.

I couldn't find another packet of Ice Blue Raspberry to save my life, so I tried Berry Blue next. I should have probably only used half of the packet, but oh well! It's a very vibrant robin's egg blue, is all! LOL It does have some lighter areas (which I was hoping to avoid,) but I don't want it any more blue, so I'll live with it. I'd encourage anybody to try it, it's lots of fun! Be careful of dyeing your hands, though! The area circled didn't absorb as much dye as the rest, and stayed lighter.

Here's the whole skein layed out, after 2 rounds of Kool Aid dyeing.

29.11.06

Store Sneak Peek

Back at the end of September, I opened my Etsy store. I've only made one sale, and while I know that's better than waiting a long time for the first sale; I get the impression that the lack of inventory, coupled with photography that's a little dark, doesn't give potential buyers that "Wow!" impression I really want to. So, I've worked hard lately to get a ton of inventory to restock my store up. I'm also trying to figure out a small photo booth, so I can photograph all the little buggers a little quicker! (If anyone has tips, I'd LOVE to hear them!)


Anyway, I thought I'd post a sneak peek of what's going in the store. I posted a work-in-progress picture with my Tiffany craft box, but most were only partially finished; and they're much further along now! I'm really proud of this round of flowers, I'm hoping to get enough inventory together to contribute to The Sampler next year. Every month I try to buy my own, but I'm too slow! So, I thought it'd be nice to both promote my store, and get my greedy little paws on one! I'd love to hear about experiences with The Sampler, both contributing and buying/receiving. I bought a Sample Sampler (say that 3 times fast!) a few months back, and was fairly surprised at the range of products included.

27.11.06

Feeling sick...

Unfortunately, I've been feeling a little sick this whole weekend, so I don't have anything interesting to post about today. Plus, I'm headed to the vet later this afternoon (for annual visits, nobody's sick but me!) Cody & Ginger like to make it difficult for me, squirming & not sitting well for the vet; so I'm looking forward to having it done for the year.

Hope everyone had a nice Thanksgiving weekend!

22.11.06

Beige Silk Slip

Well, after a few months of procrastinating this project; I've finally picked it back up & finished it! I got the silk fabric at Vogue; I was contemplating a silk satin as well, but the tone was too yellow and it cost twice as much! I was a little concerned because it seemed semi-sheer, but it works beautifully underneath my Craft: skirt (and I'm sure it will under my other a-line skirts!)


I used my new book,
Sew What! Skirts, and drafted my own pattern, although I needed to make it smaller after I started construction. Not too hard to fix, I just sewed the skirt smaller til it fit closely over my hips. Then I enclosed the seam allowances, pressed & sewed the elastic casing (for the waistband,) closed the casing and hemmed the bottom. It's not perfect, I made the elastic casing slightly large, and the elastic tends to roll around in it. It makes a white cotton skirt wearable finally though, so I'd call this one a sucess!


On another note, it's only a month to my birthday, today; so the holidays are headed really fast! I need to get going on some projects that have stagnated!

21.11.06

Learning to Spin!

handspun yarn on spindle I'm excited to report that I'm learning how to spin yarn with a drop spindle! My sister's been a great help, showing me how spindle & wheel spinning works. Actually, I've already spun myself out of roving! LOL Saturday night I sat down and spun everything I had… so I'll just have to buy more! The merino Jenn donated was a little easier to draft than the wool (of unnamed content) I received in a recent swap, and softer. Most of it's overspun, and twists on itself a ton, but I figure everybody's got to start somewhere, right?

Also, I'm happily moving along with the silk slip. It's a little trickier than first imagined, but it was somewhat expected, I picked a nice slinky silk, and it's shifty! I knew I didn't want to use poly-satin, though; synthetics don't breathe, and especially because it's a slip, I wanted something with nice drape to it. Cross my fingers, I'll have it done soon, and be able to show off my Craft: skirt without flashing everyone my underwear!

merino handspun
The tiny ball is the merino, the stuff on the spindle is the wool-of-unnamed-content. I need to get more roving ASAP!!!

20.11.06

New Sewing Books!

Yeah... as if I need more! LOL And, they took a little longer than I'd hoped, but they made it! I got Sew U by Wendy Mullin, and Sew What! - Skirts by Francesca DenHartog. After sewing a fedora for Whiplash a few months back, I have much less fear of curves, and fitting round forms. After all, the worst thing that can happen is ripped stitches!


I've already started a beige silk slip (for my Craft: skirt,) with help from the second book! Even though it wasn't quite as simple as I'd hoped (i.e. I added ease, and you don't need it for undergarments, at least not with this slip.) I got the fabric at Vogue, a few months back, and was a little too intimidated to actually do something with it. But no more! Silk slip with elastic waistband = Easy Peasy! I decided to use a faux-flatlock seam on the inside to enclose the seam allowances; the Craft: skirt is finished this way, so I decided to keep things consistent. Basically, you trim one seam allowance down by half it's width, then fold the other side over it, and sew the whole thing down. The silk is extra ravel-y and I needed to finish the seam allowances nicely. Hopefully I'll have it done soon, even though the Chicago weather probably won't be good enough to wear it in - it's just a silk slip with a cotton skirt! The skirt was such an easy project, though; I'll have to write a tut up for it!

I'm going to write more about Sew U later, but this weekend I was totally into Sew What! - Skirts. I'd HIGHLY recommend it, especially for beginning sewers. Even though I'm not a beginner, I still really appreciate all of the tips & techniques in this book. The tone is fun, but not too joke-y or trendy (I found S&B to be too "now" in it's language.) The sub-title is 16 Styles You can make with Fabulous Fabrics - and I have some awesome fabrics laying around! My favorites are Asian Dream (a short ruffled number,) Singing the Blues (a super easy a-line with drawstring waist & pocket,) and East Meets West (a zippered a-line with bias tape waistband.)

I have 4 yards of a very soft black fabric, with a diagonal weave, that I'm hoping to get a nice skirt suit out of! I'm dreaming of a sleek pencil skirt and fitted jacket! (And to think I got the fabric for a curtain! LOL)

18.11.06

Dowel Rod Displays

Here's the custom displays I made for my sister's craft show this weekend!


They're just wood dowels, beads & bases, spray-painted in ivory & catalina green. I used satin finish paint, and I'm pretty pleased with how they turned out! Jenn liked them too, woohoo!

They were made to hold her paper crane Christmas ornaments, and I think they do so beautifully, if I do say so myself! LOL I made 2 small (one ivory, one green,) and 1 large ivory.

She's showing at Creative Collaboration Holiday Show in Downer's Grove (at the Comfort Inn at Finley rd. & Butterfield,) today until 5PM. If you're in the area and have some time, go check her stuff out!

15.11.06

Tsumami Tiffany Box

I realized pretty quickly into making tsumami kanzashi flowers, that I'd need a pretty specialized storage container for all of the different stages of construction. While I like the small plastic containers I've been using, they don't hold very much. So I set about designing a custom solution, and here's the outcome! Anyone who knows me, knows just how much I love Tiffany boxes - I'm kind of obsessed! So, I knew it had to be a part of this design.

This caddy actually started it's life as a plain jane cardboard box, with lid. How boring! Now it's robin's egg blue, with white satin ribbon; sealed with glossy Modge-Podge. I made a handle from a wire coat hanger, and covered it with the same ribbon I used on the sides. I sewed 2 pieces together to make a sleeve for the wire. The top sports a folded bow, I could never tie them very neatly, so I used fabric glue to make it neat and even. It's filled with card stock trays, stabilized with thin black ribbon at the corners, so I can stack them. The trays hold all stages of my flowers, from fabric squares to completed flowers, as well as all of the notions I need (thread, snaps, accessories.)


I originally wanted to cover the cardstock with robin's egg fabric, but when I tried it, the finished tray edges were all wavy, and I didn't like them. So, they're just plain white card stock, with 3/4" tall sides. I lined the bottoms with black felt so the petals wouldn't shift around. The larger trays have tabs in the middle, to help support the tray above it. I wanted to make a base, to be able to lift all 9 layers of trays out at once, but I couldn't bend in the steel handles enough to have clearance, and it just don't work out. It's always interesting to me, trying something new and seeing what works - and what doesn't.

The lid is inverted here, I use it to hold notions & scissors while I'm working. (The scissors I use are very heavy, and so I have to use a seperate plastic caddy to carry them, but they're also SUPER sharp, so I feel more comfortable when they're somewhere I can't accidentally stab myself!)

I've also added a sneak peak at my latest flowers! Most of what's pictured below will make it into the store (hopefully very soon!) A few are gifts, and a few I'm keeping for my greedy self - the double petal purple w/ turquoise was made to match my Femme Fedora!


I'd like to make a tutorial for a more generic craft caddy, if there's interest for it. I see those cardboard boxes at every craft store, and they're so boring, just begging for decoration! LOL There's so many different things you could do to them - decoupage, paint, ribbon & fabric, the possibilities are endless!

14.11.06

Swap goods!

Here's the wonderful good I got from AgentAlmost for the Handcrafts for Handspun swap on Craftster. He sent over 500 yds in 5 balls & 2 skeins, as well as a spin kit with cd drop spindle, roving & instructions. I'm so excited to learn how to spin!


And here's what I sent! A giant knitting needle roll (with 65 pockets!) a crochet hook case, stuffed sushi catnip toys and a skein of Simply Soft. I also added a cute turkey button I received in a recent Sampler.

I'm planning on writing up a tutorial for the crochet hook case, hopefully I'll have it done before the end of the year. (It's the holidays, and I'm lazy! LOL)

13.11.06

.:Bath Bomb Tutorial:.

I must confess that learning how to make bath bombs myself was one of the 2 crafts that got me into blogging (and it's taken me almost 8 months to write this tut!)

I couldn't stand the fact that a lot of upscale sellers charged around 5$ for their bombs - meaning that the bath it was used in, would cost 5$ each! I was absolutely determined to lower that number, of cost per bomb, and didn't mind getting a little (ok, a LOT!) dirty in the process. I'd love to share what I've learned with this immensely wonderful crafting community! (Ok, so this isn't the first bath bomb tut out there, but it's my first attempt at a tutorial, so bear with me please!)

What you'll need…
1 cup baking soda
1/2 cup citric acid*
1/3 cup Epsom salts
1 Tbsp Shea butter
1 Tsp Sweet Almond oil
1/2 Tsp fragrance or essential oil
3/4 Tsp water
Food coloring (if desired!)
Small spray bottle
Mold of desired shape (round halves, or candy molds)

Start by adding all of the dry stuff together (baking soda, citric acid, Epsom salts,) in a large mixing bowl. Then add Shea butter, almond oil & fragrance or essential oil. Mix these VERY thoroughly, until the mixture feels dry & light.

Next, if you're using coloring, add 5+ drops to 3/4 Tsp water in the small spray bottle. Spray a couple times onto the mixture, and mix immediately. This is the crucial step, because water will set off the chemical reaction between the baking soda and the citric acid. Spray very sparingly, and mix in between. The idea here is to add enough water to the mixture so it can be molded, but add too much and you're in trouble!

A good tip for beginners; try dividing the dry ingredients into 2 bowls before you spray in the water. If you add too much water, you can save the batch by adding more dry mixture, and mixing until the reaction has been neutralized (an easy way to tell is to stick you ear into the bowl, if it's crackling it's still reacting.) With practice, you'll get a feel for just how moist the mixture needs to be before it will hold it's shape when molded. Another tip - using 2 round halves to make a sphere produces the strongest bath bombs. Other shapes are possible, but can be tricky to apply enough pressure on, and to un-mold.

Once you've got enough water, you can put the dry mixture into molds. Make sure they're clean & dry before you start - don't want anything sticking! The key to this step is pressure - the more pressure you apply, the stronger it'll hold itself together. If you're using 2 round halves, fill them both, then add more mixture to the tops, and push together. Smooth the "seam" as you go, and then set aside as you mold the rest of the mixture.

After a few minutes you can un-mold your new bath bombs. Gently squeeze the mold, then you should be able to lift it off easily. Smaller shapes with lots of details can be hard to un-mold, but patience is the key. If you accidentally crush the bomb, you can add a tiny bit more water, mix thoroughly and re-mold. Let them dry overnight, then wrap with plastic wrap.

Voila! Bath bombs that cost less then 5$ each! The yield of this recipe (how many bombs you'll get,) varies with how much mixture you stuff in the molds, and the size molds you use. Larger molds = larger bombs and smaller molds = smaller bombs. I usually get 1 giant and 6 mini bombs from this recipe (the giant ones are softball sized!) You could probably get 20+ small sized bombs!


One more suggestion, if you have a small tub, use smaller molds. These bombs can leave the tub slippery, and so it's better to start with less oil in the tub, and work up to more. Good luck! I'd love to see pics if you make bombs of your own! (Also, feel free to ask if you any questions!) The frogs pictured here turned out well, but the turtles were very shallow and the legs break off very easily.


*Citric acid can be very hard to find, I'd recommend buying it online. I like Majestic Mountain Sage, they have lots of fragrance oils, no minimum purchase and shipping is actual cost. I must also mention their Jasmine fragrance oil is AMAZING!

Also, if Shea butter is expensive or hard to find, you can substitute cocoa butter or mango butter.

Please make sure you're not allergic to any of these ingredients before you use them! And be careful getting out of the tub, it can be very slippery!

10.11.06

Holiday To Do's...

Well, it's been a little while since I posted a projects list, and I couldn't think of what else to post today, so here goes! (I'm going to try and keep it vague, since most of these are gifts, and I don't want to spoil the surprises!)
  • Quilted Patchwork purse (Inspired by this tutorial.)
  • Tree Scarves (making several of these, they're quick & fun to make!)
  • Beaded Butterfly (to go on a Tree scarf.)
  • Custom bag for Jenn (I'm working with her on this one, and I'd like to make it really functional for her, as well as look really cute!)
  • Lots of bath bombs, they seem to be a real hit!
  • More knitting needle & crochet hook cases (I'll be writing a tut for the crochet hook case soon, too!)
I'd love to hear what you're making for your family & friends for the Holidays! Especially quick & easy projects! (I'm bound to add a few pin-cushions to that list! LOL)

On another note entirely, I just ordered a couple of new sewing books, and I can't wait for them to arrive! Thankfully, I seem to be pretty close to an Amazon distrobution center, because my orders usually only take a day to get to me (after processing.) Thing is, I only ever use their "Free Supersaver" shipping, so it's super nice that it usually only takes 1 day! I bought Sew What! 15 Simple Style You can Make with Fabulous Fabrics and Sew U - The Built by Wendy Guide to Making Your Own Wardrobe. I'm super excited to learn to sew garments, up until now my expirience has been mostly home decorating & bags!

8.11.06

Craft: magazine... finally arrived!

Well, I thought subscribing would mean I'd get my copy on or around the release date, but boy was I wrong! I've FINALLY received my copy… they made me wait for it, but it was worth it! I LOVE it! I can't wait to make my own LED top & robot amigurumi!


7.11.06

1/2 of my furball family!

Last night while I was taking pictures of my new bag and pendant, my kitties decided to grace me with their presence. They're pretty aloof most of the time, so I was happy to snap some pics while I had the camera in my hands, and cats in my view. Since I'm trying to get better about posting regularly, I thought I'd just use them! I don't think I've posted pictures of the cats before, just their respective Pointy Kitty effigies. So, without further ado, here is Spazz & Monkey.


Spazz is a Russian Blue, from a shelter and about 9 years old. Monkey's a stray, found behind my Mom's garage and was only 1/2lb when we got her (a little over 5 years ago.) She's a little runt still, at 11lbs; Spazz last weighed in 15lbs. Spazz is aptly named, he's a freak… he loves attention, but only when you let him come to you. If you reach out for him, he'll run away most times. Monkey got her name for climbing up everything we owned when she was a baby, including furniture & me! She's really that white, and so silky soft it's ridiculous. Spazz is more the norm, with slightly oily hair that gets dander-peppered sometimes.

My 2 dogs, Cody & Ginger are much more photogenic, so I'll have to dig a a few fun pictures of them out soon!

6.11.06

MORE goodies for me!!!

Woohoo! I've gotten some awesome gifts from family and friends, and thought I'd share. First up is the awesome felted bag my sister made me, isn't it gorgeous? She's so thoughtful, it's going to make a great project bag!!! The white handle twist is alpaca, so it's extra soft! Thanks Jenn, I LOVE it!!!

Yes, I know I'm totally spoiled - AND there's more! Mwahahahaha!!!

Next up is a beautiful bird's nest pendant, Shirley sent me (WEEKS ago! I'm so sorry it's taken me so long to post pics!) It's copper wire, with blue pearl "eggs" and glass bead "leaves" - isn't it adorable?!!!?!!! She also sent some tasty candy (which was devoured within days!) - the almond crunch pocky and fruitips were soooooo good!

She also included some goodies for my Mom & sister; spider web earrings for Mom, and a Hershey's bookmark for Jenn. A GREAT BIG Thank You!!! You're so sweet, it made my day!

Now, somehow I just have to get Jenn to start a blog!!! LOL Jenn, I WILL get you, one of these days!!! :)

(I feel I must also mention that she's working on a Lady Eleanor wrap/scarf, which I'm TOTALLY jealous of!!! I'm like a year behind everyone else, knitting-wise… Sewing wise I like to think I'm on the right track for me!)

1.11.06

Here come the Holidays!

However hard I try to get a leg up on my holiday crafting & shopping; I never seem to get my act together until the end of the year. I have such high hopes for myself, and yet somehow, I put it off until I can't anymore. I'm sure there are others out there like me, I just know it! LOL

This year I'm focused on gifts that are relatively easy to make, mostly because I've made 1 or more of them before! That's not to say I'm rushing, because I'm kind of a perfectionist when it comes to the quality of my work; but putting my best efforts into items I know can make well makes the whole lot a little easier to deal with! I'm hoping to get a few tutorials together soon, it's a big part of why I started my blog, and I haven't put together one yet! I really enjoy sharing crafts/techniques with other crafters, there's so many awesome patterns and tutorials out there!

So, with the holidays fast approaching, I'd like to wish everyone easy crafting & shopping, and lots of holiday cheer!!!

LinkWithin

Related Posts with Thumbnails