31.5.06

Sushi Knitting Needle Roll

My sister saw the giant knitting needle roll I made for my last swap and asked if I'd make one - so here it is! I sometimes think I'm Craft-Attention-Deficit-Disordered, but I finished this one in record time! Started Monday evening, it took the better part of the week to finish, but I am working on getting the Etsy store open , and a Sampler swap, so I've been kind of swamped lately! Take a closer look over at my flickr set!

Jenn, you're pretty lucky, normally I'd hafta charge 30$+ to cover the time & materials for this! I'm really proud of it! The sushi fabric was free, but I dug into my stash for the rest of it, so you're gonna owe me a craft! :) I looked at the Nagano Sakura pattern over at Knitty, and I think the yarn it calls for is going to be too scratchy for me! I was thinking maybe a Razor cami?
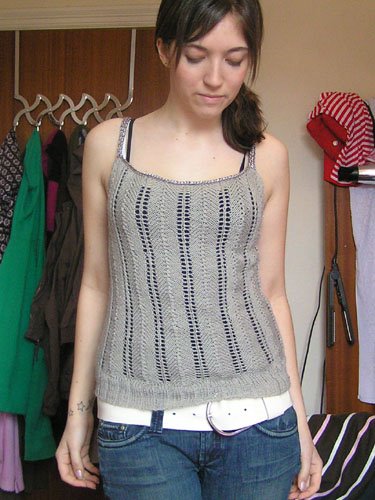
I saw it a few weeks ago, and thought it was so cute, but once again, I haven't tackled knitting in the round yet! You'll have to sit me down, and beat the circular fear out of me! LOL

2 balls of Sirdar Snuggly doesn't sound too bad for materials, to me (@ 4.35$ per ball I won't be breaking the bank for it!) Now...color? I like 394 Hyacinthe Mix, 355 Chocolate, 341 Blueberry, and 222 Surf. What can I say, I like a lot of different colors!?!?! :)

June already...?

Time is so much about perception; it's funny how fast or slow something can seem, depending on how much fun, or no fun at all it is. This year I've created a lot more than in past years, which I'm happy about. There's still that feeling that I could be working harder or doing more, and I just have to remind myself I'm charting my own territory, and it's not going to work or be efficient all of the time.

I'm working on a sushi themed knitting needle roll for my sister, and should be finished soon! I think it's coming great, and I hope she'll like it, and really enjoy it. The behemoth has 50 pockets!

25.5.06

Crafty Ginger opens shop!

Well, soon anyway! Hey, I'm trying to speed things along as fast as I can, but doing something different can sometimes be tricky & time comsuming. I'm kind of a control freak, so things like packaging have to be spot on before I send things out - and I don't even have anything listed in My Etsy Shop yet! So here's a sneak peak at my packaging, I'm really proud of it; but I'd also really love to hear some other opinions too! My business card -

I can say though, that I'm enjoying making tsumami flowers. My husband calls it tedious, but I think the hand work is relaxing. I'll be selling them in pairs with barrettes that they can snap on & off from, on wristlets, and well - anything else I can put them on!

On another note; what is it about the Japanese that so captivates Americans attention? At least in the craft world, kawaii amigurumi, felt sushi & neko cats seem to be so popular! I admit I am a definite fan, I just wish that Japanese craft books weren't so expensive or hard to come by in some places (where I live!)

24.5.06

Tsumami kanzashi flowers galore!

A few weeks ago I discovered Tsumami Kanzashi - a technique to fold fabric squares into flower petals. I found this excerpt on PuchiMaiko.com,

The word “Tsumami” means to pinch – specifically, pinching a square piece of fabric to form a shape. The word “Kanzashi” means hairpin. Tsumami Kanzashi is a traditional Japanese art form that dates back over 200 years. Tsumami kanzashi is most often seen worn by maiko (apprentice geisha) and young girls for shichi-go-san celebrations however, with the revival of traditional arts, and a younger generation appreciating them – tsumami kanzashi have become quite a fashionable accessory to be worn both with contemporary clothing and kimono.

Mrs. Graham-Diaz is an excellent authority on Japanese Geisha, and their traditions; as well as a major inspiration to me! Her tsumami flowers are what really drove me to learn the "pinching" technique, and although I don't use traditional methods as she does, I hope I can still honor Japanese tradition!

My method differs from the traditional in that I don't use rice paste to glue the petals together. I start by sewing the petals together in a circle, then I glue a circle of fleece or felt to the back with fabric glue. I use different tools to get a more angled or flat appearance to the petals. I also don't use habotae silk, as it's not what I have on hand. I use scraps from all sorts of projects, cotton denim, twill, silk charmeuse. If I've got enough scrap fabric left over, it's going to end up as tsumami flowers! LOL I finish with a button, the centers can look very messy and I like them to look neat.

Some fabric works much better than others for the pinching technique, I've found medium weight tencel twill to be too slippery for my smallest 1" petals. Silk charmesue was a challenge, but definitely worth it - it's got such a lustrous sheen to it. Double petals, with an inner color and a different outer, are also much more challenging. I must say though, that I really enjoy working on these flowers. They are exciting and sometimes difficult, but ultimately so satisfying.

If anyone is interested, here are a few tsumami kanzashi links -

  • Puchi Maiko - Small accessories inspired by the art of geisha, maiko and traditional Japan.
  • Ganjin Geisha - Gallery of wonderful kanzashi!
  • Maya Doll - Amazing kanzashi for sale - watch out, they're pricey! :)
  • Kanzashi movies - #13 Edo hair ornaments: actual craftsman using traditional techniques. This one is ABSOLUTELY worth the time! (5 movies, a few minutes each)

17.5.06

Marble magnets - easiest craft project ever!!!


I just finished the easiest project ever - picture marble magnets! Talk about simple, just glue the picture to the back of a a flat marble (floral or aquatic arrangements), then glue the magnet. She-bang! You're done!

This first set was made with images from Gwen Frostic - a Michigan artist I've loved since I was a child. She made beautiful block prints of nature and it's creatures.

The second set is seashells, and they're the smaller 3/4" size. I really enjoyed this project because it was so easy! I haven't been feeling good this week, so I'm glad I could find a balance and not work on projects that would have made me feel crappy longer.


I'm thinking of selling these on Etsy, but because they're so popular I want to do them a little differently. The larger 1 1/2" size are a little more uncommon, and magnetic boxes/boards are even more so. I think I'll be able to come up with something I'm happy with.

On the subject of Etsy, I'm hard at work building up inventory, working on new ideas and packaging details. I am SO excited, but I want to do it right, so I'm now planning on opening my store on June 21st, the summer solstice.

21.4.06

Dreamfall's FINALLY here!!!

Ok, so after waiting years for a sequel to The Longest Journey - It's FINALLY here! It had so much wrapping on the outside I actually cut myself ripping into it. I felt like a 6 year-old; and it ROCKS!

Except, I can't play it yet. Or rather, I shouldn't play it yet, because I'm having family over for dinner, and I have to clean my house. Oh yes, you read that right, I am cleaning my house in favor of playing a pc game I've waited 5+ years for. Man, I can't wait til Sunday - then I'm free!

Except sort of not really free - my craft room is a volcano threatening to erupt right now. I cleared the closet so I could paint & organize it, and apparently my timing couldn't have been worse! It's literally mountains of stashness, just waiting to take a tumble! I just hope I can tame it before it annihilates me. LOL I can't stand chaos in my craft room.

17.4.06

Suprise for me!

My sister was so sweet today! She gave me a beautiful pair of Mrs. Beetons - which I've been wanting since I ran across the pattern a bunch of months back! I'm so intimidated by knitting in the round - both my mother and sister reminded me today how easy it is, but my fears can't be quelled quite that easy.

In exchange - I'll be making her some tsumami kanzashi... that is once I figure out what color she wants most and what function she'd use most (barrette, ponytail holder, pin, etc); Jenn if you're reading this, lemme know! (I actually wore the Mrs. Beetons with my sweatercoat home! Thanks again!)

4.4.06

Fancy footwork!


Craftster's current challenge (#10 - Footwear Facelift) totally had me thinking... I love shoes, and knew I wanted to try my hand - but I just wasn't quite sure what to do about it...

Then it totally hit me! I bought a pair of beaded white satin mules as a back-up for my wedding shoes, (my kitties had gnawed at my first pair, and I didn't have the heart to investigate for some time) and they cost like 9$ because I found them on clearance at DSW (but I wasn't going to be heartbroken if my little expiriment didn't pan out.)

Anyhoo - I've been wanting to try Kool-aid dyeing since I saw the article on Knitty, a few months ago. My original concept was to dip-dye the shoes, so the color was more intense at the tip and more subtle towards the top. In reality, it seemed that wouldn't work out very well... so I just dyed the toe end, and left the heel end white. I really like the contrast... and the beading is mostly white or clear, so the white heels tie the two colors together, I think.

Here's a work-in-progress shot... the blue in the cup is what the Kool-Aid really looked like! I was nervous my shoes would end up electric blue too, instead of the lovely aqua water color I was going for.

I started by adding 1/3 of the dry powdered Kool-Aid mix to 8oz. of water, and the remaining 2/3 dry mix to 6oz. of water. I originally wanted an ombre (or gradient) effect, and thought I'd achieve this in multiple color washes in the two different strengths. The more diluted solution seemed to barely tint the white silk at all, so I quicky switched to the stronger stuff. Basically I just painted it on with a brush, not being too careful as I had set the shoes in pyrex pans first. Some dripped off, but each "layer" was about 2-3 washes over the whole front of the shoe. Then I blasted them with a hair dryer, in the hopes that would set the colorfastness of the dye (I would hate to try and wear them, and then end up ruining them!)

I knew I wanted to do more than just dye these - although I was very suprised how well the Kool-Aid dye worked out! So, I dove into my bead stash... and came up with a bunch of seed beads (which I drove myself nuts sorting & stringing - only to decide they were too dainty to use!) and a wonderful strand of vintage aqua channel-backed rhinestones. The channel backs allowed me to sew them on... which was interesting, because I've never sewn anything onto shoes before!

Here's an in-progress shot of the rhinestones being sewn on... I was hoping to get away with only sewing every third or fourth down, but quickly decided I needed to sew them all. It was pretty tough, as I tried to use my fingernails as thimbles! I used 123 of the rhinestones, and have about 20 left, I think.

Well, I'm so tired I can't type very well anymore, so I'll just finish with pictures of the completed shoes!


1.4.06

Nifty Thrifty Bag Challenge


Craftster is my new online home... and it's down right now! Which is so frustrating because today is the last day for the Nifty Thrifty Bag Challenge; and I've made an awesome entry - that I have to finish the handle for before I post (to Craftster)!

I took a very old men's black overcoat and turned it into a vertical hanging messenger bag. I don't know the content of the coat fabric, but it didn't felt in the wash, and it's extemely soft - and linty! It took forever to take apart, the lining was sewn to the coat in so many places. I tried to salvage as much yardage as I could, I knew I wanted to make a bag for my laptop (even though I have a very nice one LOL!), and I knew I wanted it to have piping (welting) so I knew I'd need a lot.

After I decided what to use, I had to then figure out what to make. So, I hopped over to Bluefly to look at expensive bag shapes to copy. Lo and behold there was a lovely little 1-grand number by Dolce&Gabbana - just begging to be tweaked for my purposes! It's appx. 15" square, black leather with a fold-over flap closure. It has chain straps and a leather handle - I didn't care for the gold tone metal details, I prefer silver. It's got a magnetic closure (these can be pricey, I used a button for mine), leopard lining with an interior zip pocket.


My version is 11" wide by 13" tall & 2" deep. It has a fold-over flap that closes with a beaded loop over a button from the coat I reconstructed for this challenge. It has matching piping (5/8"wide), purple satin lining with a patch pocket (with embroidery detail!), chrome plated chain straps and a leather handle.

In order to qualify for the Nifty Thrifty Challenge, I had to spend 5$ or less on my bag. The chain straps were dog collars, 2 for 1.49$ each, and I bought 10ft of nylon rope to fill the piping @0.15 a foot. Total cost was 4.50$ The coat was a thrift store find a decade ago, the leather handle came from my husband's old motorcycle jacket, the purple poly satin was left over from a Christmas present for my sister's husband....and I think that's it!

I was originally going to applique a skull & crossbones onto the back out of a lovely ivory cashmere sweater. When I realized I only had a week to complete this challenge I had to nix it :( - it's too bad, I vectored a cool skull all custom just for me!

9.3.06

Tiffany Box Pin-cushion


I was over browsing through Whip Up, when I saw the CUTEST pin-cushions ever! Mini cakes & pies - talk about delicious! Although I love cakes & pies, when I saw the picture I knew I had to make mine a Tiffany Box! Here's the two together, the real Tiffany, and my pin-cushion box.

Well, it turns out the original idea came from Aoi, over at Craftster, so I want to give her snaps! Go Aoi! You rock! Mine's made from scraps of aqua wool gabardine (my new pinched pleat drape!), it's 3" square, and the "lid" is 1" tall. The ribbon is 7/8" wide white satin (and the bow took about a dozen tries - I'm no Tiffany & Co. employee!). I lined the interior with the paper tape I used to support my drape (I guess it's called buckram? Anybody know?) to give it some stiffness at the corners, and make it really boxy! Here's a closeup of just the pin-cushion.

I'm pretty proud of the finished product, it's my first handsewn item I'm happy with (I'm kind of a perfectionist). Now I hafta go out and make a set of white bow shrinky-dink pins to match!

If you've got questions or comments, I'd love to hear them!

Did I mention I love Tiffany boxes? It's funny because I don't always love their jewelry (I like some of it, just not all); but something about the whimsy their packaging evokes really captures my interest, and I think the tiny boxes are so cute!

5.3.06

Poor little blog...

I need to put some life into this page design, I hate templates, and I am a designer after all.
Obviously it will feature Ginger, the both joy/bane of my life/existence...I love her natural curiosity, and the strange fear that tempers it; even bringing in the daily mail incites both excitement and fear. The excitement always wins, and she must nibble corners off immediately...
I also want it to be a place to share all of my craftiness, so the page should showcase the work, not overpower it.

3.3.06

Ginger...Crafty as a fox!


This is Ginger, my nearly two year old Shiba Inu. She's the source of a lot of joy and frustration for me, as she's just as stubborn as I am!

Also known as (AKA): The Nibbler, Gino Beano
My first post in my first blog... I feel like such a loser, all years behind on this stuff! I just hope I can pick this up a little quicker than I did Photoshop!

LinkWithin

Related Posts with Thumbnails