21.12.06

Happy (early) Birthday to me!

Chocolate Caramel Cashmere Cupcake


For a while, I've seen Betz White's recycled sweater cupcakes around a bunch of different blogs. I knew I wanted to try it myself, and I had the perfect sweater laying around, just begging to be reconned into my very own cupcake pin cushion! A CASHMERE cupcake pin cushion! Chocolate caramel cashmere cupcake - to be precise! LOL Normally I'm more of a yellow cake kind of girl, but the sweater I started with was brown & tan, and it looks delicious anyway!

I'm off to try and clean a bit before tomorrow - my 26th birthday! I hate clutter, but I hate cleaning on my birthday even more! My husband & I are going to a wonderful restaurant in Lombard, The Capital Grille; and I'm very excited. We were there a couple of weeks ago with his parents, and loved it. I just need to try the white chocolate mousse this time. Mmmmmm.....

16.12.06

...not even close!

To being finished cleaning & re-organizing my craft room, that is. I must be crazy to have started the redo right before the holidays, but the choas was driving me crazy. I need order, and I'm not quite there yet. Sigh, I know I'll get it done, but I wonder, if I'll be able to manage it before Christmas, or if it will push right on through to the new year. Christmas is only a week and two days away, and my birthday's one of them. I wish this time of year didn't pass so quickly, but it seems to go quicker & quicker every year.

I hope to have new craft room pics soon, and I'll have fun Christmas goodies (after they're received!) Hopefully, cross my fingers, the weather around Chicago will stay nice, and I won't have to shovel another foot of super-wet & heavy snow! (Or maybe I should wish for a snow-blower? LOL) Happy Holidays, everybody!

13.12.06

Holiday Cheer!

It's easy for me to get over- whelmed this time of year, and this year I'm way behind on a lot of my projects. I'm also stressing, because most of what I'm working on are Christmas gifts; I don't have anything to post about, and fear that I might not until after the holiday! I guess that means I should just point out some fun holiday crafting cheer!

If you haven't seen them yet, go check out Hillary's Elf Stitchette embroidery patterns, they're super sweet! (Hillary is the amazing talent behind Wee Wonderfuls, and recently divulged that she's pregnant with her second child! Congrats & Good Luck with the morning sickness!)

I also love these button trees, I think I saw them first on Whip Up, and now there's a Flickr group full of them!

11.12.06

.:Tree Branch Earrings Tutorial:.

These are made with copper colored craft wire and genuine apatite beads.

whipupI've decided to enter these in this month's Whiplash contest - Gifts & Decoration. I wanted to wait & post pics of the first pair I made, because they're a gift for a special friend; but I didn't want to spoil a Christmas present (it's no fun to know ahead of time!) Good luck to all of the participants, and Happy Holidays, too!

Hand wired tree branch earrings would make a lovely Christmas gift! (Don't worry! They're super easy, and quick too!)

Materials you'll need:
28g wire
Briolette beads, or any kind you'd like
Small jump rings (optional)
Earring wires

Start by cutting a length of wire, between 18" - 24" (go longer if you want longer earrings, shorter if you prefer a more petite size.) Thread the largest bead onto the wire, and pull the 2 ends even. This doesn't have to be perfect.


Hold the wires between your fingers, close to the bead, and twist them together. The goal is to get a nice even twist, but be careful! Twist too much, and you run the risk of snapping one (or both,) of your wires. When you twist the wires together, try and balance them, instead of wrapping one wire around another. Holding the wires in a "V" while you twist will help achieve a balanced twist. This will form the lowest hanging branch.


Next, take another bead (I used increasingly smaller beads, as I wired them, you're working from the bottom towards the top,) and thread it onto one of the wires. It doesn't matter which wire. Move it close to the first bead, and then play with the spacing, until you get a result that pleases you. Pull the loose end back up to the other wire, and hold there.

Twist the second branch into place, remembering not to twist too tightly! I find that odd numbers of branches look more organic than evens, and that asymmetry also makes them feel more branch-like. (Basically, if they're perfect, they won't look like real tree branches, so little irregularities are a good thing!)

The rest of the beads follow the same way, I used smaller beads, and gave them smaller branches each time, to lend a realistic feel. You can wire whatever kind of beads you want, into almost any shape you want.

To finish, I simply twisted about 2 " past how tall I wanted the earrings to be. Bend on a circle shape (I used a double-pointed knitting needle, sz2) and wrap the end around the stem. Clip closely (see below for picture of clipped & bent ends,) and fold the ends as close to the stem as you can, with pliers, if you have them. I added a jump ring to the first pair I made, but it's not a necessity though. Attach to the ear wires, and you're done! Easy peasy, and oh so pretty!

I'd love to hear comments & suggestions, I'd be happy to help if you need it!


Creative Commons License
This work is licensed under a Creative Commons Attribution-NonCommercial-ShareAlike 2.5 License.

9.12.06

Ack!

Even though I've gotten a little better about posting regularly, I still totally missed yesterday; and I was planning on posting the earring tutorial. Sorry guys! I should have it ready on Monday. For some strange reason, I decided the Holidays would be the perfect time to re-organize my craft room. Ha! Ok, so I knew the timing was bad anyway, but I couldn't stand the chaos any longer. I just had to do something about it. So, the tutorial is actually all written, I just have to go back and get all the pictures taken, and put them in an order that makes sense. Hopefully by the end of next week, I'll have the room clean enough to post about again, too! I loved seeing other people's craft rooms in the Flickr pool!

6.12.06

Tree Branch Earrings

When I was little, my family and I vacationed on a wonderful lake in Michigan. We had a cute little bluff cabin, it had the most amazing view. I never got to stay in the front bedroom (the adults had first dibs,) but it had 2 walls of windows, and the sunrise was incredible coming up over the lake & the hills. I'll never forget it, but I'm glad I have a very good visual memory of what it looked like, because it was sold & demolished several years ago. It was so sad to be so forced into letting something go, but it really proved to me that everything changes, and you just have to be grateful for the time you get.

I'm grateful that I can still remember what the fireworks looked like from the middle of the lake; and the awesome little secret passage from the kid's bedroom to the bathroom. It went through the back of the closet, and wasn't very secret, but I loved it anyway. The town's called Beulah, but it's not the same anymore, either. Lots of money to build lots of big houses meant the small town charm faded. I'll never forget it, though; the smell of ripe wild raspberries and the cool breezy forest hikes. Another Michigan treasure is Gwen Frostic, a wildlife artist who owned a print shop near Beulah (she's since passed, but her work is carried on by her children.)

It was a yearly treat to go into the print shop, we got note cards, stickers, framed prints, books and really anything else they'd print on. The shop was as close as I've ever seen to nature come straight indoors. Tree branches on every wall, windows to the outside forests and prints of nature covered the walls, and the large printing machines were showcased in the front. They were always going, and I can recall staring for what felt like hours. Every detail was so cared for, even the book paper had deckled edges, and it looked so organic. If you like nature, check out the website, I absolutely LOVE her prints!

I've been very inspired by nature lately, even though the Chicago weather's cold & snowy! I saw this concept in a very high end jewelry catalog, and knew I could replicate it with materials more in my budget. Although I have long dreamed of being able to use tourmaline, sapphire, gold & all sorts of expensive supplies!

These earrings were totally easy peasy to make, and I'll be posting a tutorial soon! You can use any wire/beads you want, from colored craft wire & plastic beads, all the way up to gold wire and gemstone beads. These are fine silver wire with lilac freshwater pearls.

4.12.06

My sewing machine

It seems another trend going around the crafty blogs lately - showing off your sewing machine! Of course, I had to get in on it; I love my current machine! It's a Husqvarna/Viking 6460, and probably older than I am! But it's a workhorse, and it's never let me down, (unlike my first machine, a cheap plastic Husky star, that died within 18 months of purchase.) It's all metal, and probably 30-40 lbs, I don't tend to move it very much though. I use the metal casing to my advantage, sticking every little doodad right at hand, with magnets!


I found it on Ebay, and I looked for this particular model, because it's what my Mom's been sewing on my whole life. (Her's is 1970"s brown, though - LOL!) And, coincidentally enough, my twin sister has a Viking 6400 series as well. Great minds think alike! :P I use a vintage incense holder for all my broken or damaged sharps (needles & pins.) It's Confucius! I use a small plastic divided container to hold all of my machine parts, presser feet, needles, and anything else I might need to sew.

Recently, I heard a rumor that Viking isn't manufacturing out of Sweden anymore, so I'd caution potential new buyers to review newer model's performance. My machine is 20+ years old, and (knock on wood!) is still sewing strong!

30.11.06

Where, oh where can this fabric be?

I'm just dying to find this fabric!

It's featured in the Asian Dream skirt in Sew What! Skirts, and I ADORE it! I've been looking and looking, and I can't seem to track it down, can anybody help me? (The polka dots are trim, and not part of the motif.)

It's actually slightly blue-er, and the red is more pink, really. If anyone can find it for me, I'll swap nearly anything for it!

Kool Aid Dyed Yarn

This is the final result - yeay robin's egg blue yarn!

Alright, so I'm obsessed with robin's egg blue, have been for 3+ years now! I still love purple (my first favorite color,) but I knew I had to try for robin's egg, since it's so hard a color yarn to find. I started with Lion brand Wool in cream. For my first try I only used one packet of Ice Blue Raspberry Kool-Aid, and it turned out slightly more minty green, and less robin's egg blue than I wanted. No matter, just dye, dye again! LOL

Here's the color after the first round of dyeing.

I couldn't find another packet of Ice Blue Raspberry to save my life, so I tried Berry Blue next. I should have probably only used half of the packet, but oh well! It's a very vibrant robin's egg blue, is all! LOL It does have some lighter areas (which I was hoping to avoid,) but I don't want it any more blue, so I'll live with it. I'd encourage anybody to try it, it's lots of fun! Be careful of dyeing your hands, though! The area circled didn't absorb as much dye as the rest, and stayed lighter.

Here's the whole skein layed out, after 2 rounds of Kool Aid dyeing.

29.11.06

Store Sneak Peek

Back at the end of September, I opened my Etsy store. I've only made one sale, and while I know that's better than waiting a long time for the first sale; I get the impression that the lack of inventory, coupled with photography that's a little dark, doesn't give potential buyers that "Wow!" impression I really want to. So, I've worked hard lately to get a ton of inventory to restock my store up. I'm also trying to figure out a small photo booth, so I can photograph all the little buggers a little quicker! (If anyone has tips, I'd LOVE to hear them!)


Anyway, I thought I'd post a sneak peek of what's going in the store. I posted a work-in-progress picture with my Tiffany craft box, but most were only partially finished; and they're much further along now! I'm really proud of this round of flowers, I'm hoping to get enough inventory together to contribute to The Sampler next year. Every month I try to buy my own, but I'm too slow! So, I thought it'd be nice to both promote my store, and get my greedy little paws on one! I'd love to hear about experiences with The Sampler, both contributing and buying/receiving. I bought a Sample Sampler (say that 3 times fast!) a few months back, and was fairly surprised at the range of products included.

27.11.06

Feeling sick...

Unfortunately, I've been feeling a little sick this whole weekend, so I don't have anything interesting to post about today. Plus, I'm headed to the vet later this afternoon (for annual visits, nobody's sick but me!) Cody & Ginger like to make it difficult for me, squirming & not sitting well for the vet; so I'm looking forward to having it done for the year.

Hope everyone had a nice Thanksgiving weekend!

22.11.06

Beige Silk Slip

Well, after a few months of procrastinating this project; I've finally picked it back up & finished it! I got the silk fabric at Vogue; I was contemplating a silk satin as well, but the tone was too yellow and it cost twice as much! I was a little concerned because it seemed semi-sheer, but it works beautifully underneath my Craft: skirt (and I'm sure it will under my other a-line skirts!)


I used my new book,
Sew What! Skirts, and drafted my own pattern, although I needed to make it smaller after I started construction. Not too hard to fix, I just sewed the skirt smaller til it fit closely over my hips. Then I enclosed the seam allowances, pressed & sewed the elastic casing (for the waistband,) closed the casing and hemmed the bottom. It's not perfect, I made the elastic casing slightly large, and the elastic tends to roll around in it. It makes a white cotton skirt wearable finally though, so I'd call this one a sucess!


On another note, it's only a month to my birthday, today; so the holidays are headed really fast! I need to get going on some projects that have stagnated!

21.11.06

Learning to Spin!

handspun yarn on spindle I'm excited to report that I'm learning how to spin yarn with a drop spindle! My sister's been a great help, showing me how spindle & wheel spinning works. Actually, I've already spun myself out of roving! LOL Saturday night I sat down and spun everything I had… so I'll just have to buy more! The merino Jenn donated was a little easier to draft than the wool (of unnamed content) I received in a recent swap, and softer. Most of it's overspun, and twists on itself a ton, but I figure everybody's got to start somewhere, right?

Also, I'm happily moving along with the silk slip. It's a little trickier than first imagined, but it was somewhat expected, I picked a nice slinky silk, and it's shifty! I knew I didn't want to use poly-satin, though; synthetics don't breathe, and especially because it's a slip, I wanted something with nice drape to it. Cross my fingers, I'll have it done soon, and be able to show off my Craft: skirt without flashing everyone my underwear!

merino handspun
The tiny ball is the merino, the stuff on the spindle is the wool-of-unnamed-content. I need to get more roving ASAP!!!

20.11.06

New Sewing Books!

Yeah... as if I need more! LOL And, they took a little longer than I'd hoped, but they made it! I got Sew U by Wendy Mullin, and Sew What! - Skirts by Francesca DenHartog. After sewing a fedora for Whiplash a few months back, I have much less fear of curves, and fitting round forms. After all, the worst thing that can happen is ripped stitches!


I've already started a beige silk slip (for my Craft: skirt,) with help from the second book! Even though it wasn't quite as simple as I'd hoped (i.e. I added ease, and you don't need it for undergarments, at least not with this slip.) I got the fabric at Vogue, a few months back, and was a little too intimidated to actually do something with it. But no more! Silk slip with elastic waistband = Easy Peasy! I decided to use a faux-flatlock seam on the inside to enclose the seam allowances; the Craft: skirt is finished this way, so I decided to keep things consistent. Basically, you trim one seam allowance down by half it's width, then fold the other side over it, and sew the whole thing down. The silk is extra ravel-y and I needed to finish the seam allowances nicely. Hopefully I'll have it done soon, even though the Chicago weather probably won't be good enough to wear it in - it's just a silk slip with a cotton skirt! The skirt was such an easy project, though; I'll have to write a tut up for it!

I'm going to write more about Sew U later, but this weekend I was totally into Sew What! - Skirts. I'd HIGHLY recommend it, especially for beginning sewers. Even though I'm not a beginner, I still really appreciate all of the tips & techniques in this book. The tone is fun, but not too joke-y or trendy (I found S&B to be too "now" in it's language.) The sub-title is 16 Styles You can make with Fabulous Fabrics - and I have some awesome fabrics laying around! My favorites are Asian Dream (a short ruffled number,) Singing the Blues (a super easy a-line with drawstring waist & pocket,) and East Meets West (a zippered a-line with bias tape waistband.)

I have 4 yards of a very soft black fabric, with a diagonal weave, that I'm hoping to get a nice skirt suit out of! I'm dreaming of a sleek pencil skirt and fitted jacket! (And to think I got the fabric for a curtain! LOL)

18.11.06

Dowel Rod Displays

Here's the custom displays I made for my sister's craft show this weekend!


They're just wood dowels, beads & bases, spray-painted in ivory & catalina green. I used satin finish paint, and I'm pretty pleased with how they turned out! Jenn liked them too, woohoo!

They were made to hold her paper crane Christmas ornaments, and I think they do so beautifully, if I do say so myself! LOL I made 2 small (one ivory, one green,) and 1 large ivory.

She's showing at Creative Collaboration Holiday Show in Downer's Grove (at the Comfort Inn at Finley rd. & Butterfield,) today until 5PM. If you're in the area and have some time, go check her stuff out!

15.11.06

Tsumami Tiffany Box

I realized pretty quickly into making tsumami kanzashi flowers, that I'd need a pretty specialized storage container for all of the different stages of construction. While I like the small plastic containers I've been using, they don't hold very much. So I set about designing a custom solution, and here's the outcome! Anyone who knows me, knows just how much I love Tiffany boxes - I'm kind of obsessed! So, I knew it had to be a part of this design.

This caddy actually started it's life as a plain jane cardboard box, with lid. How boring! Now it's robin's egg blue, with white satin ribbon; sealed with glossy Modge-Podge. I made a handle from a wire coat hanger, and covered it with the same ribbon I used on the sides. I sewed 2 pieces together to make a sleeve for the wire. The top sports a folded bow, I could never tie them very neatly, so I used fabric glue to make it neat and even. It's filled with card stock trays, stabilized with thin black ribbon at the corners, so I can stack them. The trays hold all stages of my flowers, from fabric squares to completed flowers, as well as all of the notions I need (thread, snaps, accessories.)


I originally wanted to cover the cardstock with robin's egg fabric, but when I tried it, the finished tray edges were all wavy, and I didn't like them. So, they're just plain white card stock, with 3/4" tall sides. I lined the bottoms with black felt so the petals wouldn't shift around. The larger trays have tabs in the middle, to help support the tray above it. I wanted to make a base, to be able to lift all 9 layers of trays out at once, but I couldn't bend in the steel handles enough to have clearance, and it just don't work out. It's always interesting to me, trying something new and seeing what works - and what doesn't.

The lid is inverted here, I use it to hold notions & scissors while I'm working. (The scissors I use are very heavy, and so I have to use a seperate plastic caddy to carry them, but they're also SUPER sharp, so I feel more comfortable when they're somewhere I can't accidentally stab myself!)

I've also added a sneak peak at my latest flowers! Most of what's pictured below will make it into the store (hopefully very soon!) A few are gifts, and a few I'm keeping for my greedy self - the double petal purple w/ turquoise was made to match my Femme Fedora!


I'd like to make a tutorial for a more generic craft caddy, if there's interest for it. I see those cardboard boxes at every craft store, and they're so boring, just begging for decoration! LOL There's so many different things you could do to them - decoupage, paint, ribbon & fabric, the possibilities are endless!

14.11.06

Swap goods!

Here's the wonderful good I got from AgentAlmost for the Handcrafts for Handspun swap on Craftster. He sent over 500 yds in 5 balls & 2 skeins, as well as a spin kit with cd drop spindle, roving & instructions. I'm so excited to learn how to spin!


And here's what I sent! A giant knitting needle roll (with 65 pockets!) a crochet hook case, stuffed sushi catnip toys and a skein of Simply Soft. I also added a cute turkey button I received in a recent Sampler.

I'm planning on writing up a tutorial for the crochet hook case, hopefully I'll have it done before the end of the year. (It's the holidays, and I'm lazy! LOL)

13.11.06

.:Bath Bomb Tutorial:.

I must confess that learning how to make bath bombs myself was one of the 2 crafts that got me into blogging (and it's taken me almost 8 months to write this tut!)

I couldn't stand the fact that a lot of upscale sellers charged around 5$ for their bombs - meaning that the bath it was used in, would cost 5$ each! I was absolutely determined to lower that number, of cost per bomb, and didn't mind getting a little (ok, a LOT!) dirty in the process. I'd love to share what I've learned with this immensely wonderful crafting community! (Ok, so this isn't the first bath bomb tut out there, but it's my first attempt at a tutorial, so bear with me please!)

What you'll need…
1 cup baking soda
1/2 cup citric acid*
1/3 cup Epsom salts
1 Tbsp Shea butter
1 Tsp Sweet Almond oil
1/2 Tsp fragrance or essential oil
3/4 Tsp water
Food coloring (if desired!)
Small spray bottle
Mold of desired shape (round halves, or candy molds)

Start by adding all of the dry stuff together (baking soda, citric acid, Epsom salts,) in a large mixing bowl. Then add Shea butter, almond oil & fragrance or essential oil. Mix these VERY thoroughly, until the mixture feels dry & light.

Next, if you're using coloring, add 5+ drops to 3/4 Tsp water in the small spray bottle. Spray a couple times onto the mixture, and mix immediately. This is the crucial step, because water will set off the chemical reaction between the baking soda and the citric acid. Spray very sparingly, and mix in between. The idea here is to add enough water to the mixture so it can be molded, but add too much and you're in trouble!

A good tip for beginners; try dividing the dry ingredients into 2 bowls before you spray in the water. If you add too much water, you can save the batch by adding more dry mixture, and mixing until the reaction has been neutralized (an easy way to tell is to stick you ear into the bowl, if it's crackling it's still reacting.) With practice, you'll get a feel for just how moist the mixture needs to be before it will hold it's shape when molded. Another tip - using 2 round halves to make a sphere produces the strongest bath bombs. Other shapes are possible, but can be tricky to apply enough pressure on, and to un-mold.

Once you've got enough water, you can put the dry mixture into molds. Make sure they're clean & dry before you start - don't want anything sticking! The key to this step is pressure - the more pressure you apply, the stronger it'll hold itself together. If you're using 2 round halves, fill them both, then add more mixture to the tops, and push together. Smooth the "seam" as you go, and then set aside as you mold the rest of the mixture.

After a few minutes you can un-mold your new bath bombs. Gently squeeze the mold, then you should be able to lift it off easily. Smaller shapes with lots of details can be hard to un-mold, but patience is the key. If you accidentally crush the bomb, you can add a tiny bit more water, mix thoroughly and re-mold. Let them dry overnight, then wrap with plastic wrap.

Voila! Bath bombs that cost less then 5$ each! The yield of this recipe (how many bombs you'll get,) varies with how much mixture you stuff in the molds, and the size molds you use. Larger molds = larger bombs and smaller molds = smaller bombs. I usually get 1 giant and 6 mini bombs from this recipe (the giant ones are softball sized!) You could probably get 20+ small sized bombs!


One more suggestion, if you have a small tub, use smaller molds. These bombs can leave the tub slippery, and so it's better to start with less oil in the tub, and work up to more. Good luck! I'd love to see pics if you make bombs of your own! (Also, feel free to ask if you any questions!) The frogs pictured here turned out well, but the turtles were very shallow and the legs break off very easily.


*Citric acid can be very hard to find, I'd recommend buying it online. I like Majestic Mountain Sage, they have lots of fragrance oils, no minimum purchase and shipping is actual cost. I must also mention their Jasmine fragrance oil is AMAZING!

Also, if Shea butter is expensive or hard to find, you can substitute cocoa butter or mango butter.

Please make sure you're not allergic to any of these ingredients before you use them! And be careful getting out of the tub, it can be very slippery!

10.11.06

Holiday To Do's...

Well, it's been a little while since I posted a projects list, and I couldn't think of what else to post today, so here goes! (I'm going to try and keep it vague, since most of these are gifts, and I don't want to spoil the surprises!)
  • Quilted Patchwork purse (Inspired by this tutorial.)
  • Tree Scarves (making several of these, they're quick & fun to make!)
  • Beaded Butterfly (to go on a Tree scarf.)
  • Custom bag for Jenn (I'm working with her on this one, and I'd like to make it really functional for her, as well as look really cute!)
  • Lots of bath bombs, they seem to be a real hit!
  • More knitting needle & crochet hook cases (I'll be writing a tut for the crochet hook case soon, too!)
I'd love to hear what you're making for your family & friends for the Holidays! Especially quick & easy projects! (I'm bound to add a few pin-cushions to that list! LOL)

On another note entirely, I just ordered a couple of new sewing books, and I can't wait for them to arrive! Thankfully, I seem to be pretty close to an Amazon distrobution center, because my orders usually only take a day to get to me (after processing.) Thing is, I only ever use their "Free Supersaver" shipping, so it's super nice that it usually only takes 1 day! I bought Sew What! 15 Simple Style You can Make with Fabulous Fabrics and Sew U - The Built by Wendy Guide to Making Your Own Wardrobe. I'm super excited to learn to sew garments, up until now my expirience has been mostly home decorating & bags!

8.11.06

Craft: magazine... finally arrived!

Well, I thought subscribing would mean I'd get my copy on or around the release date, but boy was I wrong! I've FINALLY received my copy… they made me wait for it, but it was worth it! I LOVE it! I can't wait to make my own LED top & robot amigurumi!


7.11.06

1/2 of my furball family!

Last night while I was taking pictures of my new bag and pendant, my kitties decided to grace me with their presence. They're pretty aloof most of the time, so I was happy to snap some pics while I had the camera in my hands, and cats in my view. Since I'm trying to get better about posting regularly, I thought I'd just use them! I don't think I've posted pictures of the cats before, just their respective Pointy Kitty effigies. So, without further ado, here is Spazz & Monkey.


Spazz is a Russian Blue, from a shelter and about 9 years old. Monkey's a stray, found behind my Mom's garage and was only 1/2lb when we got her (a little over 5 years ago.) She's a little runt still, at 11lbs; Spazz last weighed in 15lbs. Spazz is aptly named, he's a freak… he loves attention, but only when you let him come to you. If you reach out for him, he'll run away most times. Monkey got her name for climbing up everything we owned when she was a baby, including furniture & me! She's really that white, and so silky soft it's ridiculous. Spazz is more the norm, with slightly oily hair that gets dander-peppered sometimes.

My 2 dogs, Cody & Ginger are much more photogenic, so I'll have to dig a a few fun pictures of them out soon!

6.11.06

MORE goodies for me!!!

Woohoo! I've gotten some awesome gifts from family and friends, and thought I'd share. First up is the awesome felted bag my sister made me, isn't it gorgeous? She's so thoughtful, it's going to make a great project bag!!! The white handle twist is alpaca, so it's extra soft! Thanks Jenn, I LOVE it!!!

Yes, I know I'm totally spoiled - AND there's more! Mwahahahaha!!!

Next up is a beautiful bird's nest pendant, Shirley sent me (WEEKS ago! I'm so sorry it's taken me so long to post pics!) It's copper wire, with blue pearl "eggs" and glass bead "leaves" - isn't it adorable?!!!?!!! She also sent some tasty candy (which was devoured within days!) - the almond crunch pocky and fruitips were soooooo good!

She also included some goodies for my Mom & sister; spider web earrings for Mom, and a Hershey's bookmark for Jenn. A GREAT BIG Thank You!!! You're so sweet, it made my day!

Now, somehow I just have to get Jenn to start a blog!!! LOL Jenn, I WILL get you, one of these days!!! :)

(I feel I must also mention that she's working on a Lady Eleanor wrap/scarf, which I'm TOTALLY jealous of!!! I'm like a year behind everyone else, knitting-wise… Sewing wise I like to think I'm on the right track for me!)

1.11.06

Here come the Holidays!

However hard I try to get a leg up on my holiday crafting & shopping; I never seem to get my act together until the end of the year. I have such high hopes for myself, and yet somehow, I put it off until I can't anymore. I'm sure there are others out there like me, I just know it! LOL

This year I'm focused on gifts that are relatively easy to make, mostly because I've made 1 or more of them before! That's not to say I'm rushing, because I'm kind of a perfectionist when it comes to the quality of my work; but putting my best efforts into items I know can make well makes the whole lot a little easier to deal with! I'm hoping to get a few tutorials together soon, it's a big part of why I started my blog, and I haven't put together one yet! I really enjoy sharing crafts/techniques with other crafters, there's so many awesome patterns and tutorials out there!

So, with the holidays fast approaching, I'd like to wish everyone easy crafting & shopping, and lots of holiday cheer!!!

13.10.06

::Tsumami Kanzashi Flower Snaps::

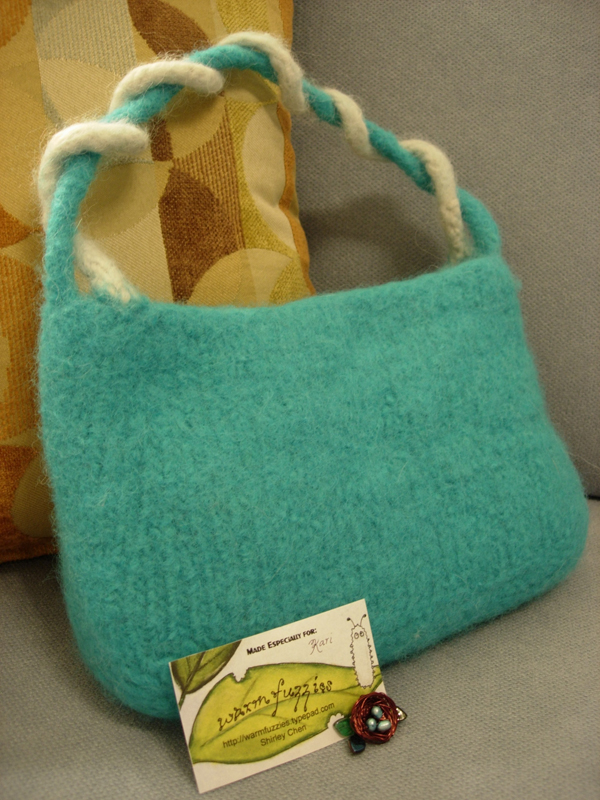
When I saw the theme this month, I knew it would work perfectly with what I've been making lately! (Plus, I've been DYING to get my greedy little hands on a Sampler subscription!) A few months ago, I found a fun technique to fold square pieces of fabric into flower petals. This excerpt from PuchiMaiko describes it best, and was what inspired me to try it myself!


The word Tsumami means to pinch – specifically, pinching a square piece of fabric to form a shape. The word Kanzashi means hairpin. Tsumami Kanzashi is a traditional Japanese art form that dates back over 200 years. Tsumami kanzashi is most often seen worn by maiko (apprentice geisha) and young girls for shichi-go-san celebrations however, with the revival of traditional arts, and a younger generation appreciating them – tsumami kanzashi have become quite a fashionable accessory to be worn both with contemporary clothing and kimono.

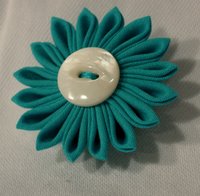
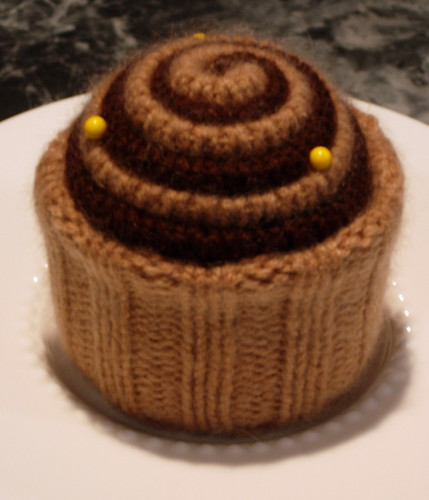
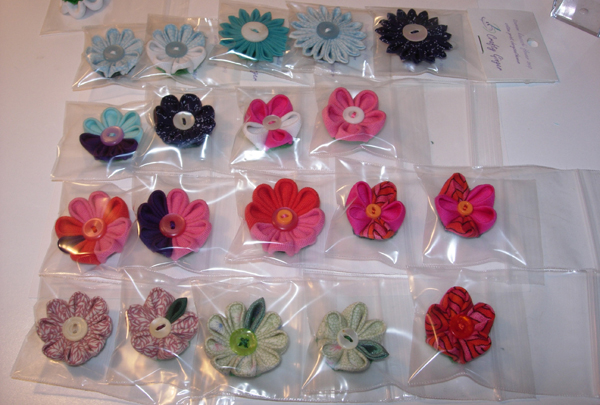
What I really like, though, is that I now have a use for all of those little fabric scraps! The petals I use most frequently are only 1" square, (you could use larger squares, but it increases the final flower size, and I prefer smaller.) I love being able to make coordinating flowers, for the sewing projects I have the scraps left-over from! A fun feature I came up with was adding a snap on the back, so I could pop them on & off. I like changing my mind a lot, and I thought it'd be fun to add other snap-on items like pin-cushions (for function!) and bows (for fun!) The snaps are anchored to a button on the front, which hides the messy middle. It also gives me the opportunity to use coordinating (or) contrast thread, or embroidery floss.

There's only 2 different petal shapes, round and pointed; but they can be combined in a ton of different ways. My favorites so far are double petal plum blossoms (which have 5 round petals that are 2 layers of fabric sandwiched together,) chrysanthemums (16 pointed petals,) and camellias (8 round petals.) I'm working on more combinations of shapes and colors, but I can't seem to decide on names for all of them!


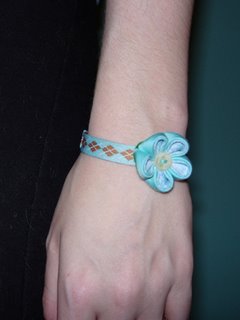
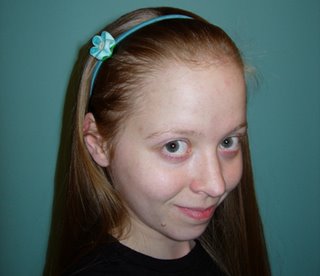
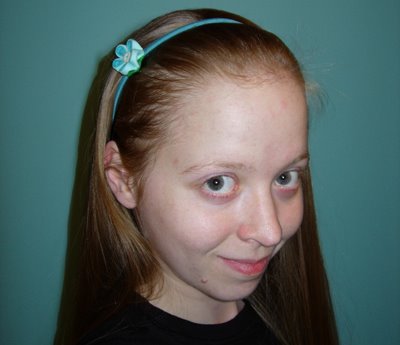
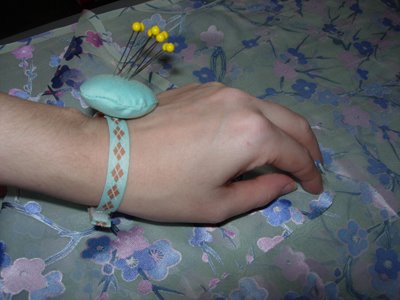
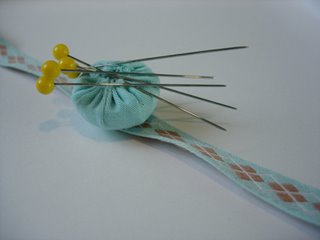
The wristlet is nice ribbon I just added some velcro and a snap to, and the headband was store bought. It's fun to think of new things I can add snaps to, and to come up with new items to snap on! I tried a magnet to hold pins & needles, but it turned out kind of heavy, and sort of flops all over the place. I guess I'll stick to plain-old stuffed pin-cushions. I'm always amazed at just how much stuffing will fit in! LOL I really like hair clips (although I can't sew the snaps on, I have to use special glue,) and God knows with all the hair I have, I need them! :)

If you'd like to see masters in action, check out these Kanzashi movies - #13 Edo hair ornaments: actual craftsman using traditional techniques. These are ABSOLUTELY worth the time! (5 movies, a few minutes each)

Sorry for the pics! Chicago sun hasn't been cooperating, and it was tough trying to photograph my own wrist! Maybe I should've waited for my husband to get home from work!

whipupI couldn't quite figure out if this belonged in the Design category, or Skill. I like the design aspects of the flowers, but they also take quite a bit of skill to create! I'm really not sure, so I'll leave it to you guys!

Good luck to all of the participants! Whiplash rocks!

LinkWithin

Related Posts with Thumbnails