Showing posts with label Whiplash. Show all posts

15.11.07

Whiplash November - Yarn Ball Earrings

I wasn't quite sure what to make for Whiplash this round, I'd had a few thoughts - but most of them required more time than I'd allowed myself. What can I say? I like complicated projects, hehe. Anyhoo, when this idea struck, I knew it was magic. How simple, just embroidery floss as "yarn," wound into balls, as earrings.

Yarn Ball Earrings - Ravelry

Well, it proved a little more difficult in practice; but I think the effort was well worth it for the finished effect. All I did was wind the floss around an eyepin, being careful to conceal the end. Making two the same size and shape was the hardest part, it just took a bit of patience. A dot of fabric glue secured the end; then I bent the wire into a loop at the top of the ball and snipped the excess off. A little bit more bending to make it all perfect, and that was really all it took. Easy peasy!

Yarn Ball Earrings

I based the color palette for these on Ravelry's colors, (have I mentioned I got my limited edition Beta t-shirt the other day? I bet I forgot… squeeeeee!) I have the color numbers of the embroidery floss, if anyone is interested - just let me know!

27.6.07

Whiplash - Altered Knitting Bag

Although I'm very creative and can come up with lots of things to make on my own; my favorite kind of craft lately is taking an item that might be a little bland, and making it perfect for me and my needs. I call it perfunctional crafting, because I love making things both more personal and functional at the same time. LOL This is my entry in June's Whiplash - Introduce Yourself.

Mod Knitting Bag - BeforeWhen I first got this bag (for Christmas from my husband,) I thought it looked a little plain. The color was really nice, but it was just a plain solid. It has a bit of texture with a diagonal weave, but other than that - a little vanilla on the outside. Nothing really wrong, just not quite "me" yet. LOL Then, I spotted it on Craft Daisies, with some upgrades! And I knew I had to make mine really "mine!"

I had the fabric for a few months, for another home dec project, and had tons leftover. It's not a quite a barkcloth, but still a very stiff fabric. Not necessarily great for bulgy items, but perfect for patterns - they've never sat correctly inside the bag, Mod Knitting Bag - Pattern Pocketwith my knitting & yarn. Voila! Perfect pattern pocket for my knitting bag! LOL I sewed up the open side first, and then used fusible tape to attach it to the bag. I'm lucky it opens tightly, otherwise I would've had to hand sew the pocket into place. Blegh! (Can you tell how I feel about hand sewing? LOL) Even still, fusing the pocket down was a little tricky, and I managed to scorch the fabric slightly. Good thing it's a beige background with darker beige and mocha accents, it's not terribly noticeable.

Mod Knitting Bag - Stripe DetailAt first, I couldn't decide what to do with the second side. The more I thought about it, though - I didn't want to clash with the print of the mod fabric. But I still wanted something really unique, jazzy & cool. I think I managed to pull those off, carrying the print up behind the second pocket, in only one repeat. Trying to explain it to my husband was a little tricky, and I didn't even really know what it would look like before I cut the piece out & pinned it in place. I was very pleased when I did though, because it turns out I like it even more than I thought I would! LOL

Mod Knitting Bag - Stripe Side

I used more fusible tape to attach the second pocket, and then used fabric glue to attach the print repeat behind & above it (so I could get it just right!) I think it turned out beautifully, and I'm really pleased with it. I love being able to personalize things, and make them work better for my needs. What mass-produced item could ever fit everyone perfectly? I say none, so tweak, twist, recycle and redo what you have to make it better!

Mod Knitting Bag - Inside Detail

11.6.07

I Can't Believe it's June...

…and I get to meet June, of Crafty Bits @ Planet June! LOL I'm picking her up from O'Hare on Friday afternoon, and I have to cross my fingers that construction traffic won't be too bad. Who am I kidding, it'll be horrible… but I'm still super-psyched! LOL I'm lucky enough to not have to brave Chicago rush hour traffic on a regular basis, though. Make that, very lucky to not have to brave it! My husband uses the train as much as he can, to drive into the city from how far out we live can take 3 hours in rush hour traffic (only 35 miles! And it really should be "Rush hours"!!!) Nuts, I know…

Please forgive my recent blog-flakiness, I love posting more than I have been able to recently. But, I've had some catching up to do on my "Spring" cleaning, and most of my crafty projects have been swappy surprises lately. (I have another one for June, but you'll have to wait til Friday!) I already spilled the doll quilt surprise, and felt a little bummed for it. I have to remember that I still think it was worth it to enter Whiplash this month, I've been too busy to play lately, and that had me a little bummed too. (I use the term "Spring" very lightly here, I've been cleaning my kitchen up. A couple Saturdays ago I cleaned out my pantry, and this past Saturday I did the fridge.)

Plus, I have some decisions to make about my store in the near future. More than half of my inventory has expired in the last month, and I don't know if I want to simply relist it as-is, or spiffy up the text or pictures. I've also been flirting with the thought of just using that stock as craft fair fodder. I've been wanting to do one since my sister did one last November. I've also noticed the trend of a lot of crafters who work on products the night before the show. Not trying to make anyone feel bad, but I want to be more prepared; and I wonder if pre-made stock will help me do that.

I also wonder if I should donate them as prizes for a Craftster board challenge or Whiplash; or maybe even hold a contest here on my blog. They seem to be all the rage lately, I just wish I could come up with a question or theme! LOL

It's not as if I want to stop working on my store altogether, I just need a break. All I've been doing the last couple months is making myself feel bad, and it's left me exhausted and completely drained. Life doesn't go the way we want sometimes (ok, alot! LOL) and I've been too stubborn to admit it, and reevaluate where I'm at and where I want to be with both my crafting and business. Time to take a step back and relax!

31.5.07

May Whiplash - Miniature Quilt

First up, I have to apologize to Star; this was supposed to be a surprise, but I missed Whiplash last month because I was sick, and I really wanted to enter this month. There's a few more surprises in the package I'm sending her, so hopefully it'll still be fun for her! (This is an entry in the Project category.)

Doll Quilt

This quilt actually started as log cabin coasters, but I saw on her blog that she'd already received a set, so I decided to turn the 4 pieces into a doll quilt. That, and the fact that I was running very low on muslin really determined the finished size - it's only 9 1/2" square. A little smaller than I was hoping for, but I think it still works as a Blythe doll blanket! LOL

Doll_quilt5It's completely machine pieced and quilted. I'd love to try a hand-pieced quilt sometimes, but my patience level has been somewhat lacking lately. The centers of the log cabin blocks are silk, I read somewhere that traditionally the center blocks were red to represent the home. I liked that thought, so I incorporated it. I'm really very pleased with how this little quilt came out, and I'm sure I'll be making a few more very soon!

I'll caution anyone wanting to try and make silk trim tape - it's a bit trickier than cotton. I should have known (or guessed!) this, but I thought it would look so pretty trimming the sides. Originally I wanted to go with 1/4" trim, but I'm glad I went for the 1/2" instead. I probably saved my sanity on that one! LOL These pictures don't really show the luster and shine of the silk trim - I snapped them right before a nasty storm came through. I'm really glad I decided to use the silk instead of cotton for the trim, I think it turned out very pretty!!! I hope Star does, too!

2.3.07

Blogger Spotlight - Crafty Bits @ Planet June

June's blog, Crafty Bits @ Planet June is a great source of inspiration to me. I found her through Whiplash, and her great projects including a denim hair band, autumn bracelet, crochet & satin evening bag and quilted tea cozy are just a few of my favorites!

She's also been working on fun fuzzy crochet animals and you can buy her patterns for fuzzy bears, bunnies, chicks & lambs here. There's a contest on her blog to find a new animal for her next fuzzy crochet pattern; and the winner gets the pattern of their choice! I'm rooting for fuzzy fox next! LOL The contest end on March 10th, so go vote!


And June, don't think I missed your Fimo R2D2!!! I can't wait to see it when it's finished!

9.2.07

Blogger Spotlight - Girl On The Rocks

I found Girl On The Rocks through Whiplash, and I knew I had to add her to my RSS reader. She makes cute and very practical items, and I just love her style! Her atari themed altoid tin had me doubled over with laughter when I saw it - I knew it'd make a comeback sooner or later! LOL Seriously, though - the detail on the tin is awesome! It's even got a faux wood-grain interior! Check out her Etsy store for it and lots more - including bacon buttons! You'll love these Shirley! :P

She's also written some cool patterns, I love the Drip coasters made from leftover sock yarn; and Shirley recently made a tissue cover from her Sniffles tissue cover pattern. I'm contemplating sizing up her beer cozy pattern, King's Cozy, for a wine bottle - my husband and I love full bodied reds!

I also had to bookmark her because we share the same name (even if she spells it differently than I do, it still starts with a K! LOL)

I really like spotlighting blogs I enjoy, and I'd love to hear about your favorite blogs too! I'm always looking for new ones, so please send me an email or leave a comment with your suggestions! Thanks!

25.1.07

Craft: Zine Goodies!

Craft: Zine T-shirt & Button


Craft: Magazine (Vol 1 & 2)
Well, last week I received my issue of Craft: vol 2, as well as a Craft: t-shirt and button! I entered the Etsy Craft: contest, and although I didn't win, the staff of Craft: was nice enough to send all of the participants t-shirts & buttons. (Okay, I photoshopped my button instead of taking another picture - there was glare!) LOL I think I probably should have asked for a medium, though, because it's a fitted tee, and the small looks like it could be a little too small.

Craft: SkirtOh well, maybe one of these days it'll be warm enough to wear my Craft: skirt out, it's been hanging in my closet since August! And I even got around to making a silk slip to go underneath! LOL I can be really lazy to get around to things that might make life a little easier, (like a snow-blower for these Chicago winters!) And organizing my craft room! LOL I'll be the first to admit I can be very stubborn sometimes, but it does come back to bite me in the butt every now and again.

On a totally different note, I'm a little suprised by how happy I am with my new year's crafting. I'm much more satisfied with where I'm at with my Etsy store, and my personal crafting hasn't suffered from neglect as much this year! Yeay! How are your new year's goals/plans going? Those damn resolutions can be so hard to keep up with! :D

11.12.06

.:Tree Branch Earrings Tutorial:.

These are made with copper colored craft wire and genuine apatite beads.

whipupI've decided to enter these in this month's Whiplash contest - Gifts & Decoration. I wanted to wait & post pics of the first pair I made, because they're a gift for a special friend; but I didn't want to spoil a Christmas present (it's no fun to know ahead of time!) Good luck to all of the participants, and Happy Holidays, too!

Hand wired tree branch earrings would make a lovely Christmas gift! (Don't worry! They're super easy, and quick too!)

Materials you'll need:
28g wire
Briolette beads, or any kind you'd like
Small jump rings (optional)
Earring wires

Start by cutting a length of wire, between 18" - 24" (go longer if you want longer earrings, shorter if you prefer a more petite size.) Thread the largest bead onto the wire, and pull the 2 ends even. This doesn't have to be perfect.


Hold the wires between your fingers, close to the bead, and twist them together. The goal is to get a nice even twist, but be careful! Twist too much, and you run the risk of snapping one (or both,) of your wires. When you twist the wires together, try and balance them, instead of wrapping one wire around another. Holding the wires in a "V" while you twist will help achieve a balanced twist. This will form the lowest hanging branch.


Next, take another bead (I used increasingly smaller beads, as I wired them, you're working from the bottom towards the top,) and thread it onto one of the wires. It doesn't matter which wire. Move it close to the first bead, and then play with the spacing, until you get a result that pleases you. Pull the loose end back up to the other wire, and hold there.

Twist the second branch into place, remembering not to twist too tightly! I find that odd numbers of branches look more organic than evens, and that asymmetry also makes them feel more branch-like. (Basically, if they're perfect, they won't look like real tree branches, so little irregularities are a good thing!)

The rest of the beads follow the same way, I used smaller beads, and gave them smaller branches each time, to lend a realistic feel. You can wire whatever kind of beads you want, into almost any shape you want.

To finish, I simply twisted about 2 " past how tall I wanted the earrings to be. Bend on a circle shape (I used a double-pointed knitting needle, sz2) and wrap the end around the stem. Clip closely (see below for picture of clipped & bent ends,) and fold the ends as close to the stem as you can, with pliers, if you have them. I added a jump ring to the first pair I made, but it's not a necessity though. Attach to the ear wires, and you're done! Easy peasy, and oh so pretty!

I'd love to hear comments & suggestions, I'd be happy to help if you need it!


Creative Commons License
This work is licensed under a Creative Commons Attribution-NonCommercial-ShareAlike 2.5 License.

13.10.06

::Tsumami Kanzashi Flower Snaps::

When I saw the theme this month, I knew it would work perfectly with what I've been making lately! (Plus, I've been DYING to get my greedy little hands on a Sampler subscription!) A few months ago, I found a fun technique to fold square pieces of fabric into flower petals. This excerpt from PuchiMaiko describes it best, and was what inspired me to try it myself!

The word Tsumami means to pinch – specifically, pinching a square piece of fabric to form a shape. The word Kanzashi means hairpin. Tsumami Kanzashi is a traditional Japanese art form that dates back over 200 years. Tsumami kanzashi is most often seen worn by maiko (apprentice geisha) and young girls for shichi-go-san celebrations however, with the revival of traditional arts, and a younger generation appreciating them – tsumami kanzashi have become quite a fashionable accessory to be worn both with contemporary clothing and kimono.
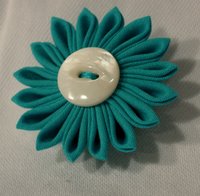
What I really like, though, is that I now have a use for all of those little fabric scraps! The petals I use most frequently are only 1" square, (you could use larger squares, but it increases the final flower size, and I prefer smaller.) I love being able to make coordinating flowers, for the sewing projects I have the scraps left-over from! A fun feature I came up with was adding a snap on the back, so I could pop them on & off. I like changing my mind a lot, and I thought it'd be fun to add other snap-on items like pin-cushions (for function!) and bows (for fun!) The snaps are anchored to a button on the front, which hides the messy middle. It also gives me the opportunity to use coordinating (or) contrast thread, or embroidery floss.

There's only 2 different petal shapes, round and pointed; but they can be combined in a ton of different ways. My favorites so far are double petal plum blossoms (which have 5 round petals that are 2 layers of fabric sandwiched together,) chrysanthemums (16 pointed petals,) and camellias (8 round petals.) I'm working on more combinations of shapes and colors, but I can't seem to decide on names for all of them!
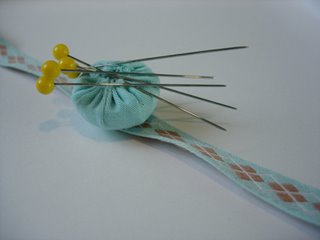


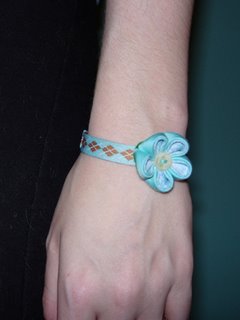
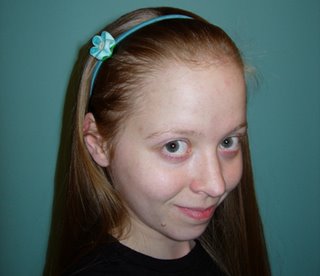
The wristlet is nice ribbon I just added some velcro and a snap to, and the headband was store bought. It's fun to think of new things I can add snaps to, and to come up with new items to snap on! I tried a magnet to hold pins & needles, but it turned out kind of heavy, and sort of flops all over the place. I guess I'll stick to plain-old stuffed pin-cushions. I'm always amazed at just how much stuffing will fit in! LOL I really like hair clips (although I can't sew the snaps on, I have to use special glue,) and God knows with all the hair I have, I need them! :)

If you'd like to see masters in action, check out these Kanzashi movies - #13 Edo hair ornaments: actual craftsman using traditional techniques. These are ABSOLUTELY worth the time! (5 movies, a few minutes each)

Sorry for the pics! Chicago sun hasn't been cooperating, and it was tough trying to photograph my own wrist! Maybe I should've waited for my husband to get home from work!

whipupI couldn't quite figure out if this belonged in the Design category, or Skill. I like the design aspects of the flowers, but they also take quite a bit of skill to create! I'm really not sure, so I'll leave it to you guys!

Good luck to all of the participants! Whiplash rocks!

15.9.06

::La Femme Fedora::

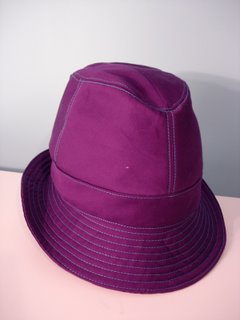
whipupFirst let me just say, Thank You Whiplash! (BTW: This is an entry in the Skill category for Whiplash September,) I realized a week ago I had a great hat pattern (Vogue #7460,) and wonderful fabrics - already on hand! That's right, this is a Finish What You Have project! That only took me 3 years to get back to and finish!

Alright, so I'm totally embarassed to admit I left it sitting that long... the thing is, I tested it with cheaper fabric, and screwed up the seam allowance; resulting in a non-fitting hat. Insert 3 years of total intimidation about sewing anything 3d. And then, something wonderful happened! I got back to it, and learned it wasn't so tough after all! I read all of the directions, twice. And measured my head, twice (LOL!) But the neatest part for me this time, was that I had already done all of the design work, all I had to do was construction.

Ok, so I'm going to skip back to the beginning here, but stay with me, it's worth it!

Ahhh, the fedora. One of my most favorite hat shapes of all time. This came about after noticing Peta Wilson wear one on La Femme Nikita, a tv show based on the film by Luc Besson. LFN was so beautifully costumed, and the sets and props were so captivating. The music was unbelievably amazing, and it's how I found Coldplay (among many other amazing artists/bands *see below for a few!) years before they got big! Anyhoo, Nikita's first fetish in the show was sunglasses. Her second was hats, and she had some awesome ones. Her oversized black fedora is my favorite, but she had wider brims & smaller ones all the way down to a tactical ski mask!

I've always wanted a fedora of my own, but thought it might be more fun in fashion colors. For this one I used cotton broadcloth (admittably too lightweight, but oh-so-gorgeous!) and turquoise silk charmeuse for the lining. I thought 1 layer of fusible interfacing wouldn't be enough to support itself, so I used 2 layers of (very lightweight) sew-in interfacing for the body, and 3 for the brim. The top & edgestitching could have been a little more even in some places, but I have to remind myself that nothing is totally perfect! It's my first-ever hat, and first contrast top & edgestitching, so I'm pretty pleased with how it turned out.

I bought the fabrics on Ebay, and only had to pick up the gosgrain ribbon trim, for the inside. (It looks a little pink in the pic, but it was just a red-toned purple. Didn't quite match my main fabric, but I liked it better than the sky blue back up.) The band and brim were the first easing I've ever done. they're slightly warped, but I managed to avoid wrinkles. Sorry for the non-action shot, I've been too tired & head-achey this week to want to pose for this one!

Oh - and it fits perfectly! Thanks again Whiplash for the much needed sewing gusto! Now I have no fear of curves, or tricky fabrics, or something new! It feels so good, I wish words could really express it! (I'm not so great with them, so I'll just say another Thanks! to everyone participating in Whiplash from month to month. You ladies (guys?) totally rock my world!)

There are so many great entries already! Good luck to everyone, and thanks again for the inspiration!

*Music from La Femme Nikita - The Philosopher Kings, Artour De Lucie, Beth Orton, Massive Attack and Diana Krall were just a few of the artists/bands I listened to while crafting my entry!

17.8.06

FO - Craft: Skirt

whipupI knew I wanted to enter in August's Whiplash challenge when I saw the topic - Wardrobe Surgery; I just didn't know what I was going to make. Then I saw Etsy's Craft: challenge, and inspiration hit! I believe craft is a very misunderstood word in America today, so I used the definition of the word to decorate a plain white skirt. I saw a few pieces of clothing a few years ago, done by Anne Demeulemeester, and this really reminds me of that. I think her words were screen-printed on, but I really like the bleeding-effect the fabric pen had. Originally I was going to use a more scrolling, French-ish font… but I've recently been watching a lot of Firefly & Serenity lately, and thought I'd take a more authentic, slightly Western, but not prairie style. I'm very pleased with the way it turned out, and it was really easy-peasy! I found snow-white cluny lace at the craft store, and knew that was all I wanted to add. (I struggle with where to stop sometimes, although not to Santino proportions!) I believe this would go in the Embellish/Decorate category.

Here is the "before" picture...
Plain white skirt...

And here's the "after!"
Craft: Skirt

Craft: Skirt
Time - 20mins to position & trace words w/ fabric pen, 5min to pin & 15min to sew lace
Total time - 40 minutes
Cost - Skirt 29.99$, fabric pen 1.99$, lace 2.28$
Total cost - 35$

I really couldn't be happier with how this one turned out! I hope you guys like it! I'd love to hear comments!

9.7.06

Heatwave Knitting Needle Roll

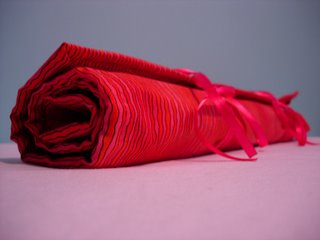
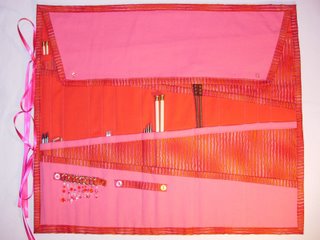
whipupOver the last couple of months I've made a few knitting needle rolls. These are giant rolls, with 50 pockets! I found the pattern (on Craftster,) here. For the latest one I made significant changes to the design, so I hope nobody thinks I'm trying to steal her pattern; I just thought it was a great place to start, and want to give her credit for it. So, I give you - Heatwave Knitting Needle Roll - for the Fancy category of July's Whiplash challenge.

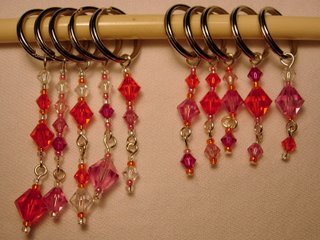
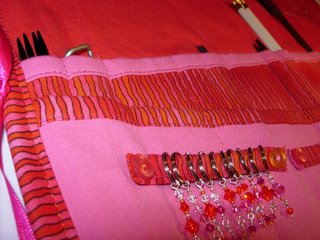
The fancy touch is the attached stitch marker holder(s), complete with Swarovski beaded stitch markers! There's 10 stitch markers total, and they're each different. My Mom like her earrings like
that, so I'm hoping that she'll appreciate their unique qualities. I also think the color combo is very nice too! The print is cotton quilting, the orange & pink solids are both cotton/ lycra blends & I used fuchsia ribbon for the ties. The stitch marker holders (as well as the needle guard flap at the top) are secured with snaps & decorative buttons. The neat thing about them is that I sewed opposite snaps on each end, so they'll hold together on a keychain or wherever!

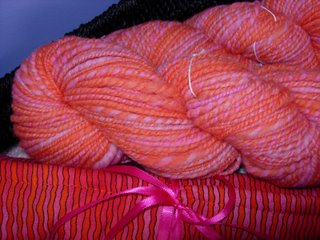
My Mom and I found the fabrics (which actually were all remnants) at Vogue Fabrics in Evanston - which was a really fun trip a couple weeks ago. I'm really looking forward to going back with her, there's just so many fabrics, trims & anything else you could think of! This is a present for her birthday, and I even had some yarn made for her (Thanks SOO much Fuzzy Bunny! Go see her shop)! I know she's going to be so happy with everything!


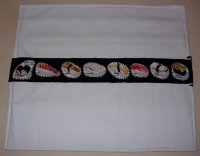
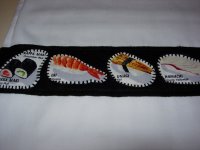
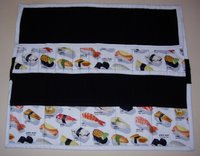
If we're allowed a second entry I'd love to enter my Sushi Needle Roll - for the Skill category (if it's eligible, of course… this one was straight off of Alexandra's pattern.) It was also made with remnants, from pajama, quilting & curtain projects! The outside embroidery was the real challenge for me, it's been years since I've done it, but I'm relatively happy with it. The spacing could have been more even, but that's the Monk in me! I made the sushi patches by gluing the sushi fabric to white denim (all of the sushi fabric is lined, it was quite transparent against the black), and then embroidering them onto black felt with fancy cotton embroidery thread. I've never sewn so many layers of fabric together before (the outside edges, I mean)! At one point it was 9, so I'm happy I could still keep the tension nice & even for all of it. It was a gift for my sister, and I'm happy to report she likes it very much!

The real story is this - my Mom & sister are packrats when it comes to knitting! So I just knew I had to help them to organize their giant collection of needles! Only a GIANT needle roll would do! The outside dimensions of both are 17½" tall by 20½" wide when unrolled, with 30 pockets that are 1" wide, 15 that are 2" wide, and 5 that are 5" wide. Now if only I could help them with their GIANT yarn stashes…. wait a minute! You guys could just donate some of it to me, my yarn stash is only 1 bin big! Hint, hint!!! ;P

I just wanted to note that I tried really hard to photograph the needle rolls better, but they're just so big, it had to be plain-jane-straight-on. I tried to incoporate some more fun angles, I hope you like them!

LinkWithin

Related Posts with Thumbnails